

Workspace Setup
Connect your Sitecore XP and SitecoreAI CMS (XMC) instances to a Kajoo Agentic workspace using the recipe setup wizard.
Once your Sitecore environment is prepared, the Kajoo team creates the workspace and configures connections using the credentials you provide. This page walks through each screen so you know exactly what to expect.
Before this stepComplete Environment Setup first and have your credentials ready.
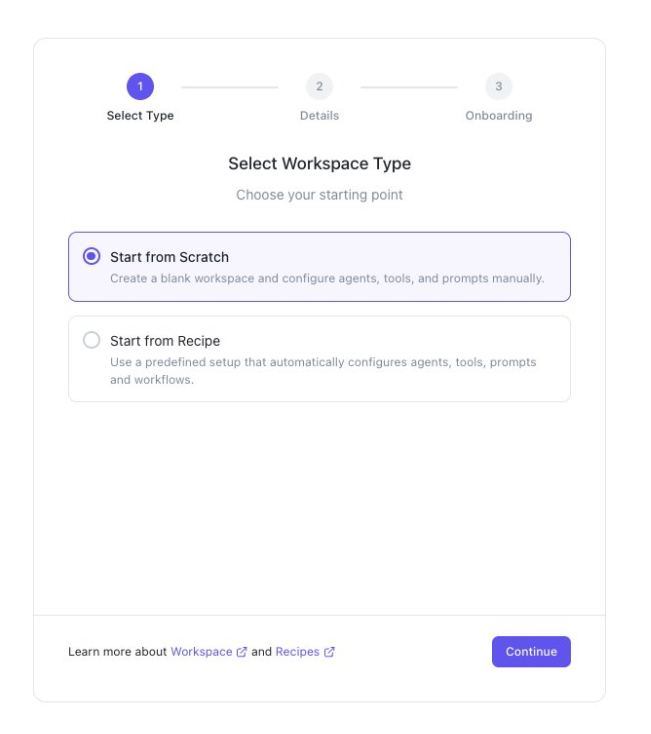
Step 1 — Select workspace type
From the Kajoo Agentic dashboard, click Create New Workspace. The three-step wizard opens at Select Workspace Type.
You have two options:
- Start from Scratch — creates a blank workspace. You manually configure all agents, tools, connections, and prompts. Use this for custom workflows.
- Start from Recipe — uses a predefined setup that automatically configures everything. Use this for the Sitecore migration.
The wizard defaults to Start from Scratch — switch to Start from Recipe. A Select Recipe dropdown appears. Choose Sitecore XP Headless to SitecoreAI Migration.
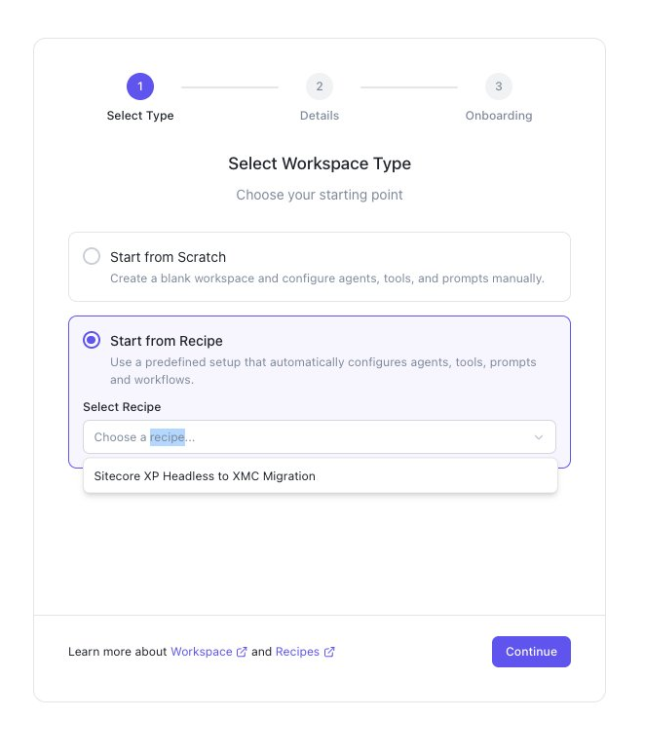
Click Continue.
Step 2 — Workspace details
The Workspace Details screen lets you name and describe the workspace. The recipe name and description are pre-filled — you can customise them.
The What will be set up section shows exactly what the recipe provisions automatically:
- 21 Agents — specialized agents covering all migration phases
- 5 MCP Connections — source Git, source Sitecore XP, target Git, target SitecoreAI (formerly XM Cloud), and Kajoo internal
- 32 Skills — tools and capabilities available to the agents
- 1 Prompt Template — pre-configured migration prompt

Click Create Workspace. You'll move to the Onboarding step.
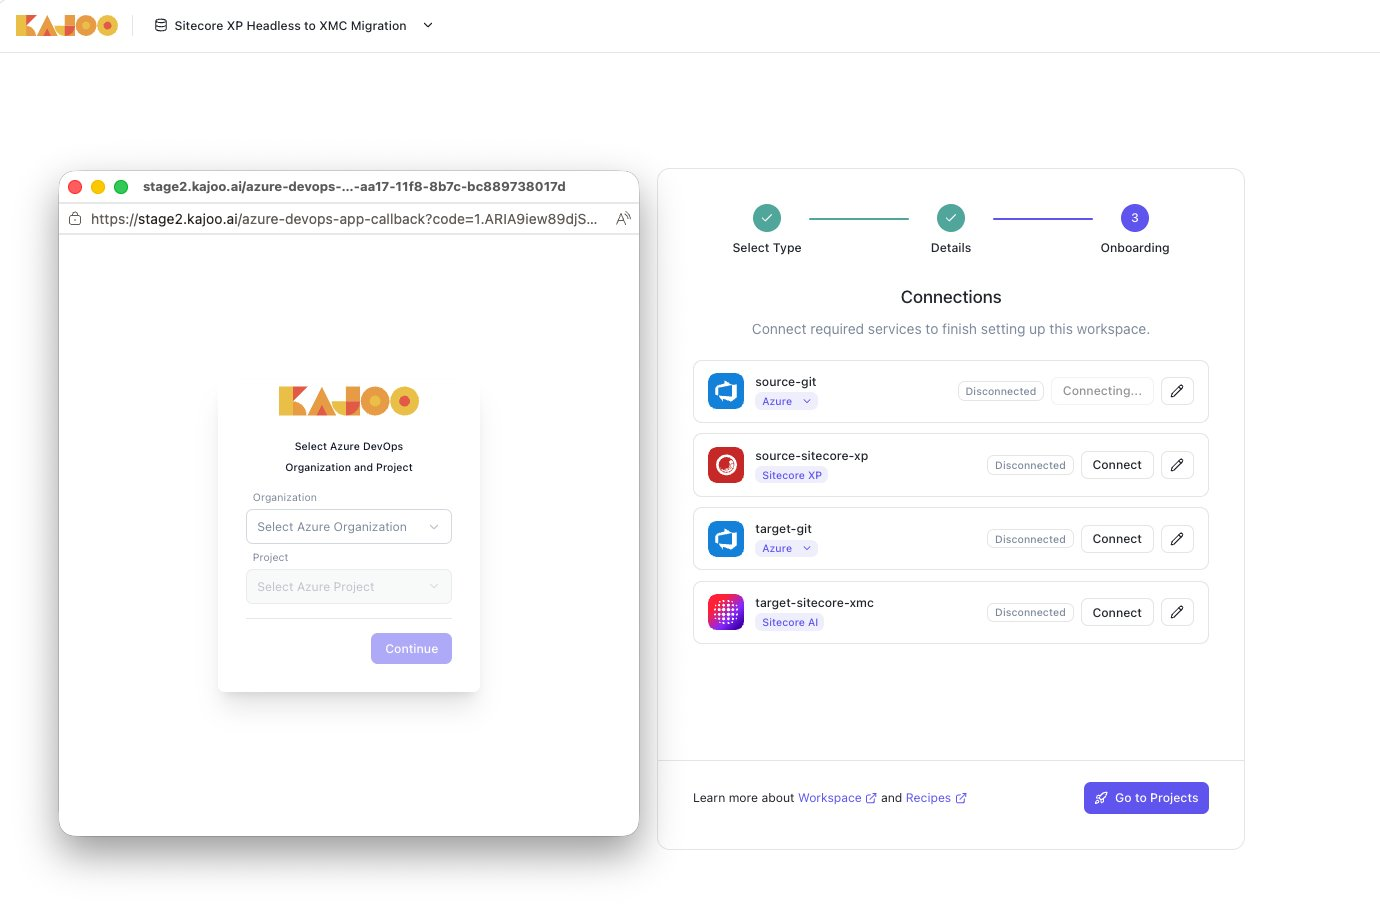
Step 3 — Connect required services
The Connections screen shows the four services the recipe needs. All start as Disconnected:
source-git— your source code repository (Azure DevOps or GitHub)source-sitecore-xp— Sitecore XP source CMStarget-git— target repository for migrated code (Azure DevOps or GitHub)target-sitecore-xmc— SitecoreAI (formerly XM Cloud) target

You can skip connections during onboarding and configure them later. Click Go to Projects to enter the workspace, then go to Settings → Configure Workspace → MCP Servers.
Choosing a Git provider
Each Git connection defaults to Azure DevOps. To switch, click the provider badge (e.g. Azure ▾) next to the connection. A dropdown shows three options: GitHub, Azure, or Sitecore AI.
Connecting via Azure DevOps
Click Connect on an Azure connection. A Kajoo popup opens asking you to Select Azure DevOps Organization and Project. Select your organization, then your project, then click Continue.
Connecting via GitHub
Switch the provider to GitHub, then click Connect. A Kajoo popup opens at Select Installation, showing the GitHub organizations where the Kajoo GitHub App is installed. Select your organization and click Continue.
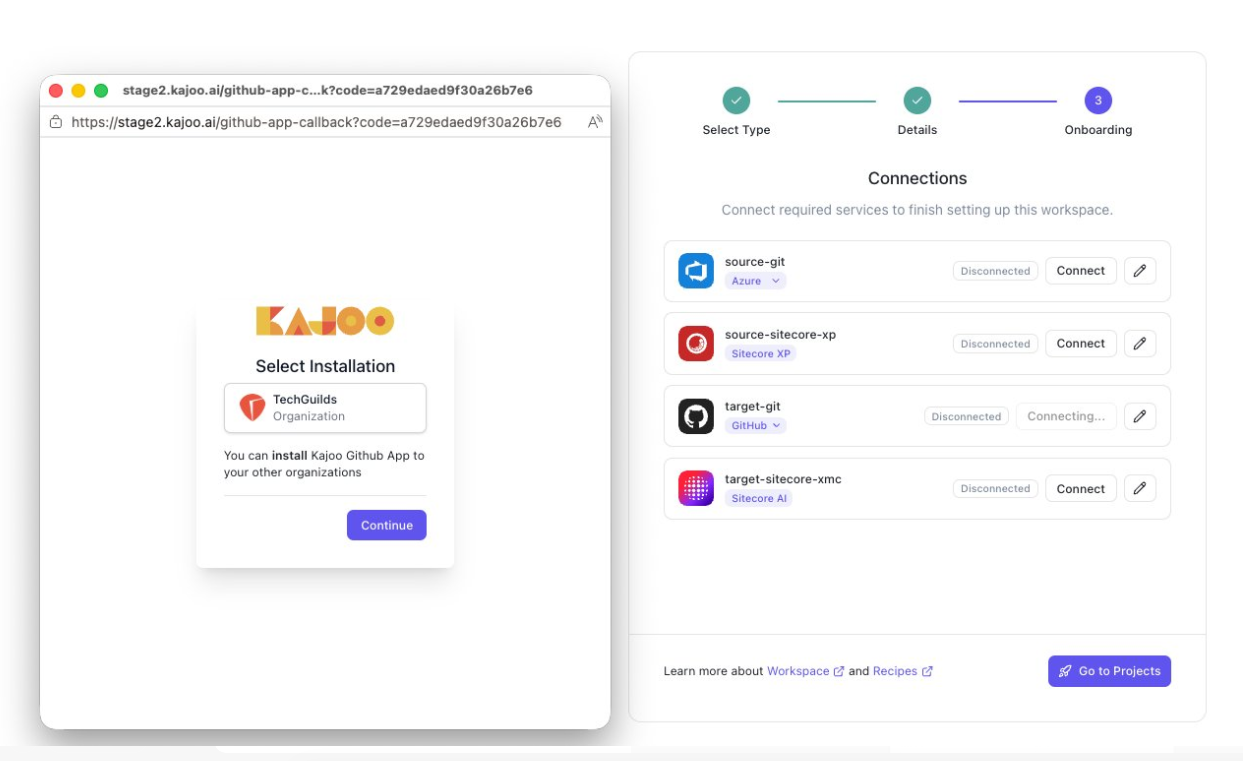
If your organization doesn't appear, click You can install Kajoo Github App to your other organizations to install it first, then retry.
Step 4 — Configure the Sitecore XP connection
Click Connect or the pencil icon next to source-sitecore-xp to open the Edit Sitecore XP Connection dialog.
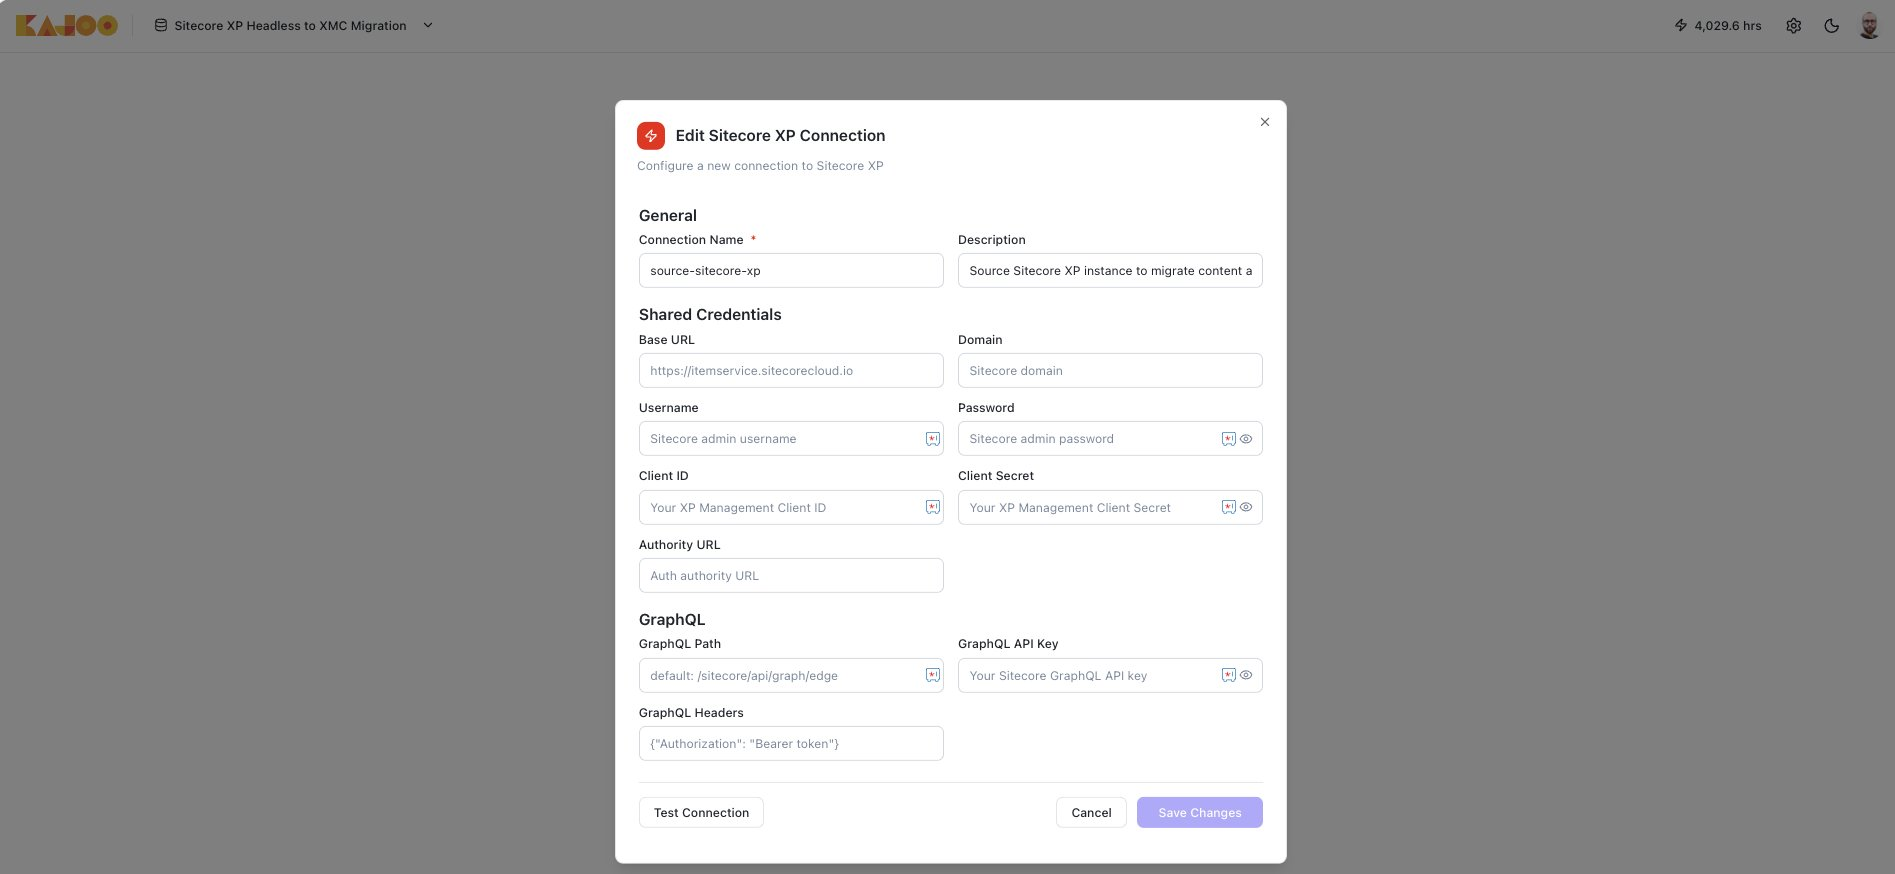
General
| Field | Value |
|---|---|
| Connection Name | Pre-filled as source-sitecore-xp — leave as-is |
| Description | Pre-filled — optional to customise |
Shared Credentials
| Field | Value |
|---|---|
| Base URL | Your XP CM URL |
| Domain | Your Sitecore domain (usually sitecore) |
| Username | SpeRemote |
| Password | SpeRemote password |
| Client ID | Your XP Management Client ID |
| Client Secret | Your XP Management Client Secret |
| Authority URL | Sitecore Identity Server URL |
GraphQL
| Field | Value |
|---|---|
| GraphQL Path | Defaults to /sitecore/api/graph/edge — leave as-is unless your environment differs |
| GraphQL API Key | Your Sitecore GraphQL API key (from /sitecore/system/Settings/Services/API Keys) |
| GraphQL Headers | Defaults to {"Authorization": "Bearer token"} — leave as-is |
Click Test Connection to verify all four services pass, then click Save Changes.
Step 5 — Configure the SitecoreAI connection
Click Connect or the pencil icon next to target-sitecore-xmc to open the Edit SitecoreAI Connection dialog.
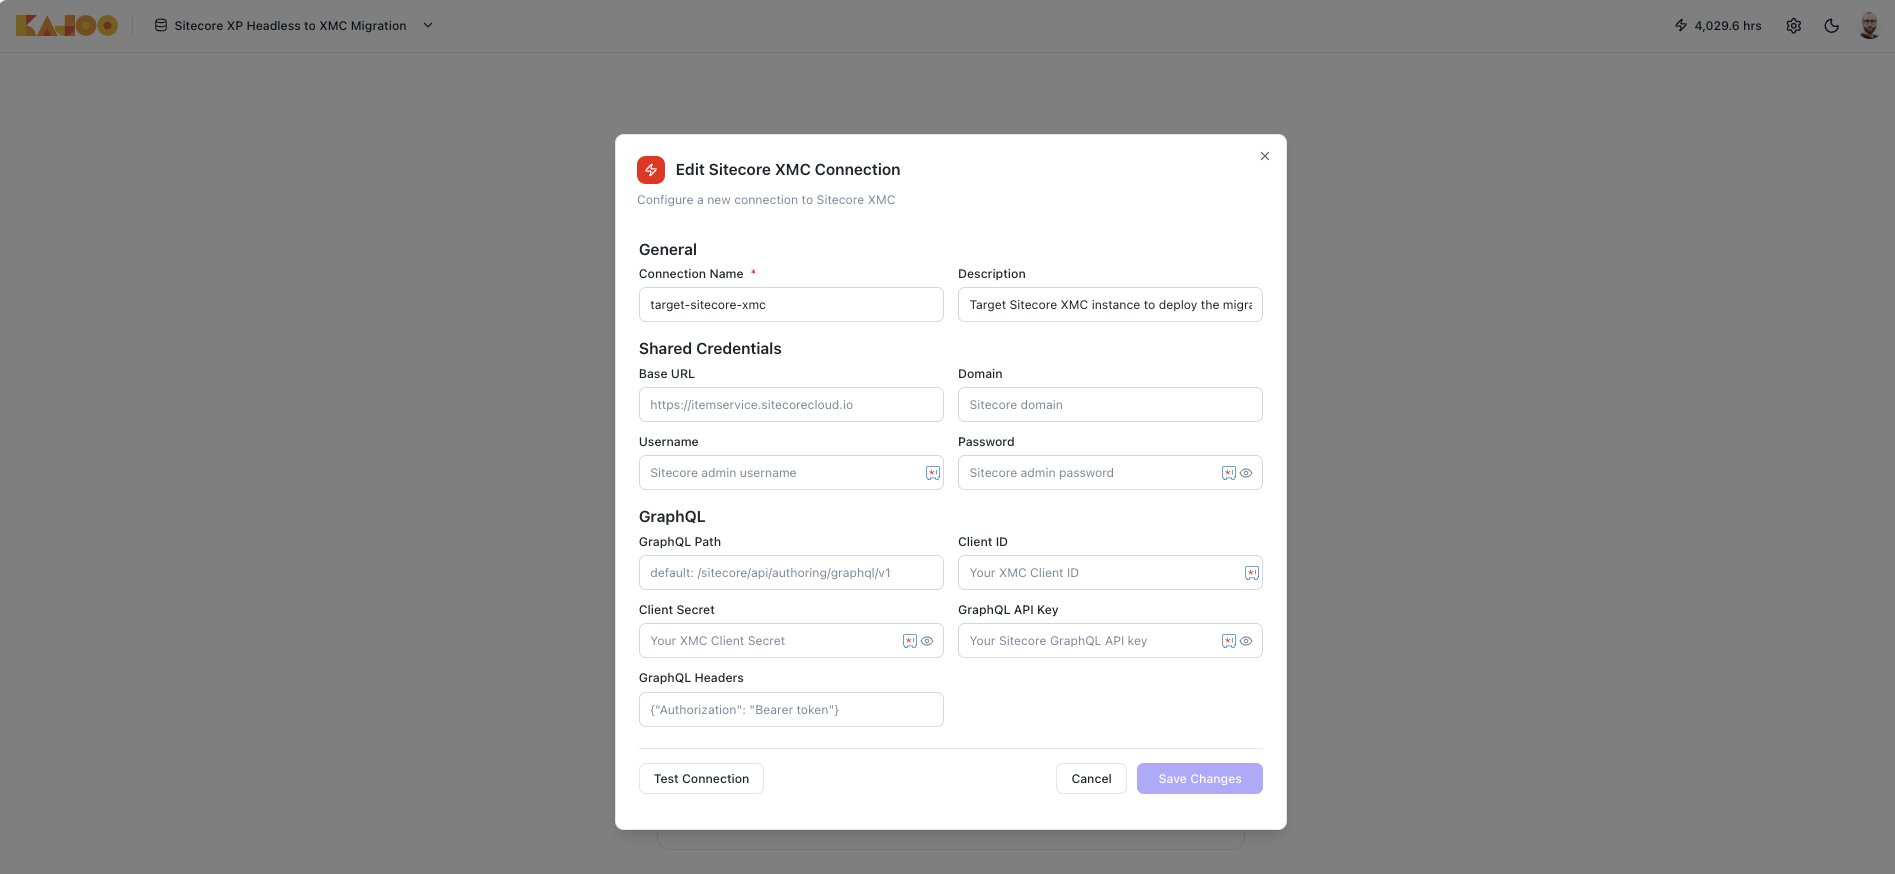
General
| Field | Value |
|---|---|
| Connection Name | Pre-filled as target-sitecore-xmc — leave as-is |
| Description | Pre-filled — optional to customise |
Shared Credentials
| Field | Value |
|---|---|
| Base URL | SitecoreAI Authoring URL (e.g. https://itemservice.sitecorecloud.io) |
| Domain | Your Sitecore domain (usually sitecore) |
| Username | SpeRemote |
| Password | SpeRemote password |
GraphQL
| Field | Value |
|---|---|
| GraphQL Path | Defaults to /sitecore/api/authoring/graphql/v1 — leave as-is |
| Client ID | Automation Client ID from Sitecore Cloud Portal |
| Client Secret | Automation Client Secret |
| GraphQL API Key | Your Sitecore GraphQL API key (optional) |
| GraphQL Headers | Defaults to {"Authorization": "Bearer token"} — leave as-is |
Click Test Connection to verify, then click Save Changes.
All connections verified
Once all four connections pass the test, click Go to Projects to enter the workspace. The migration environment is fully ready.
Expected result on all connections:
- GraphQL → Success
- Item Service → Success
- PowerShell → Success
- Management Service → Success
Any failures point back to the Sitecore-side configuration. See the Common issues section of the environment guide.