
Kontent.ai
Kajoo.ai × Kontent.ai Integration — User Guide
This guide walks you through two tasks:
- Add a Kontent.ai connection in Kajoo.
- Bind front‑end components in the Kajoo Builder to Kontent.ai content models.
1) Prerequisites
- An active Kontent.ai project with at least one Environment and Content Types.
- Delivery API token for the environment you will use (from Project settings → API keys in Kontent.ai).
- The Environment ID (codename) (from Project settings → Environments in Kontent.ai). Tip: This is the environment codename/ID, not the project ID.
- A Kajoo project and permission to manage Integrations.
2) Add a Kontent.ai connection in Kajoo
-
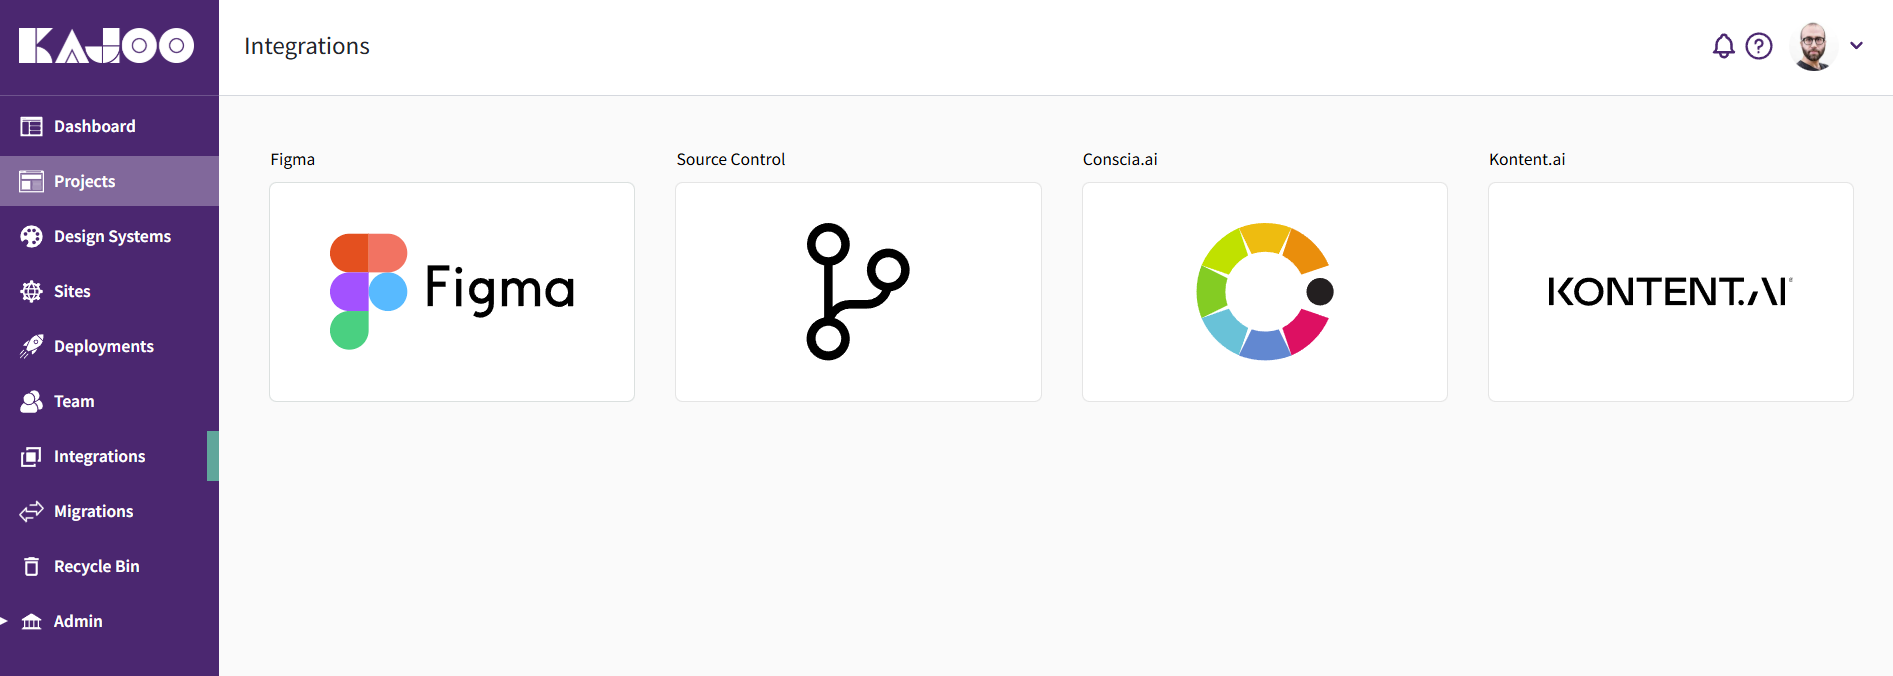
In Kajoo, open the left navigation and go to Integrations. You’ll see tiles such as Figma, Source Control, Conscia.ai, and Kontent.ai.
-
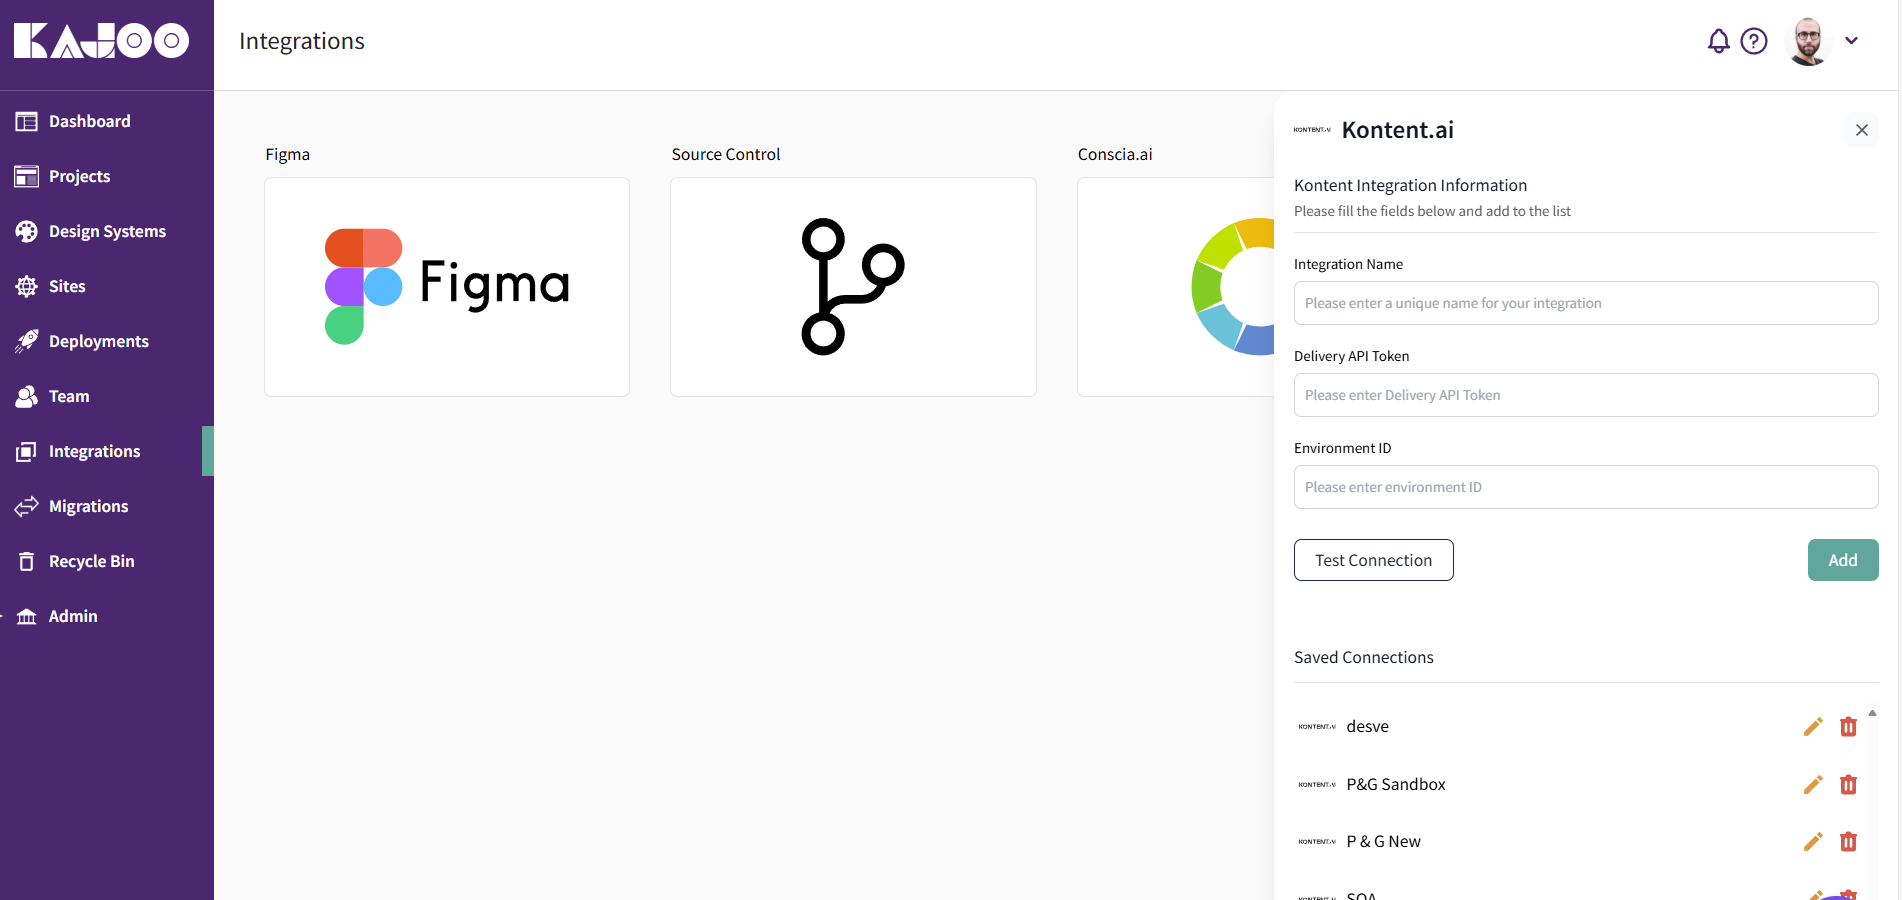
Click the Kontent.ai tile. A side panel titled Kontent.ai opens.
-
In Kontent Integration Information, fill in:
- Integration Name – any unique, human‑readable name (e.g.,
P&G Sandbox). - Delivery API Token – paste the Kontent Delivery API (read‑only) token for the target environment. Note: Use the Preview API token only if you plan to surface unpublished/preview content in non‑production scenarios.
- Environment ID – the environment codename/ID from Kontent.ai.
- Integration Name – any unique, human‑readable name (e.g.,
-
Click Test Connection.
- Success: proceed to save.
- Failure: verify the token and environment ID (see Troubleshooting below).
-
Click Add. Your connection will appear under Saved Connections. You can edit (pencil) or delete (trash) any saved connection later.
You can store multiple connections (e.g.,
Sandbox,UAT,Production) and switch between them when binding data in a component.
3) Bind components to Kontent.ai content models (Existing Content Model)
The steps below bind an existing component in Kajoo to an existing Kontent.ai Content Type.
-
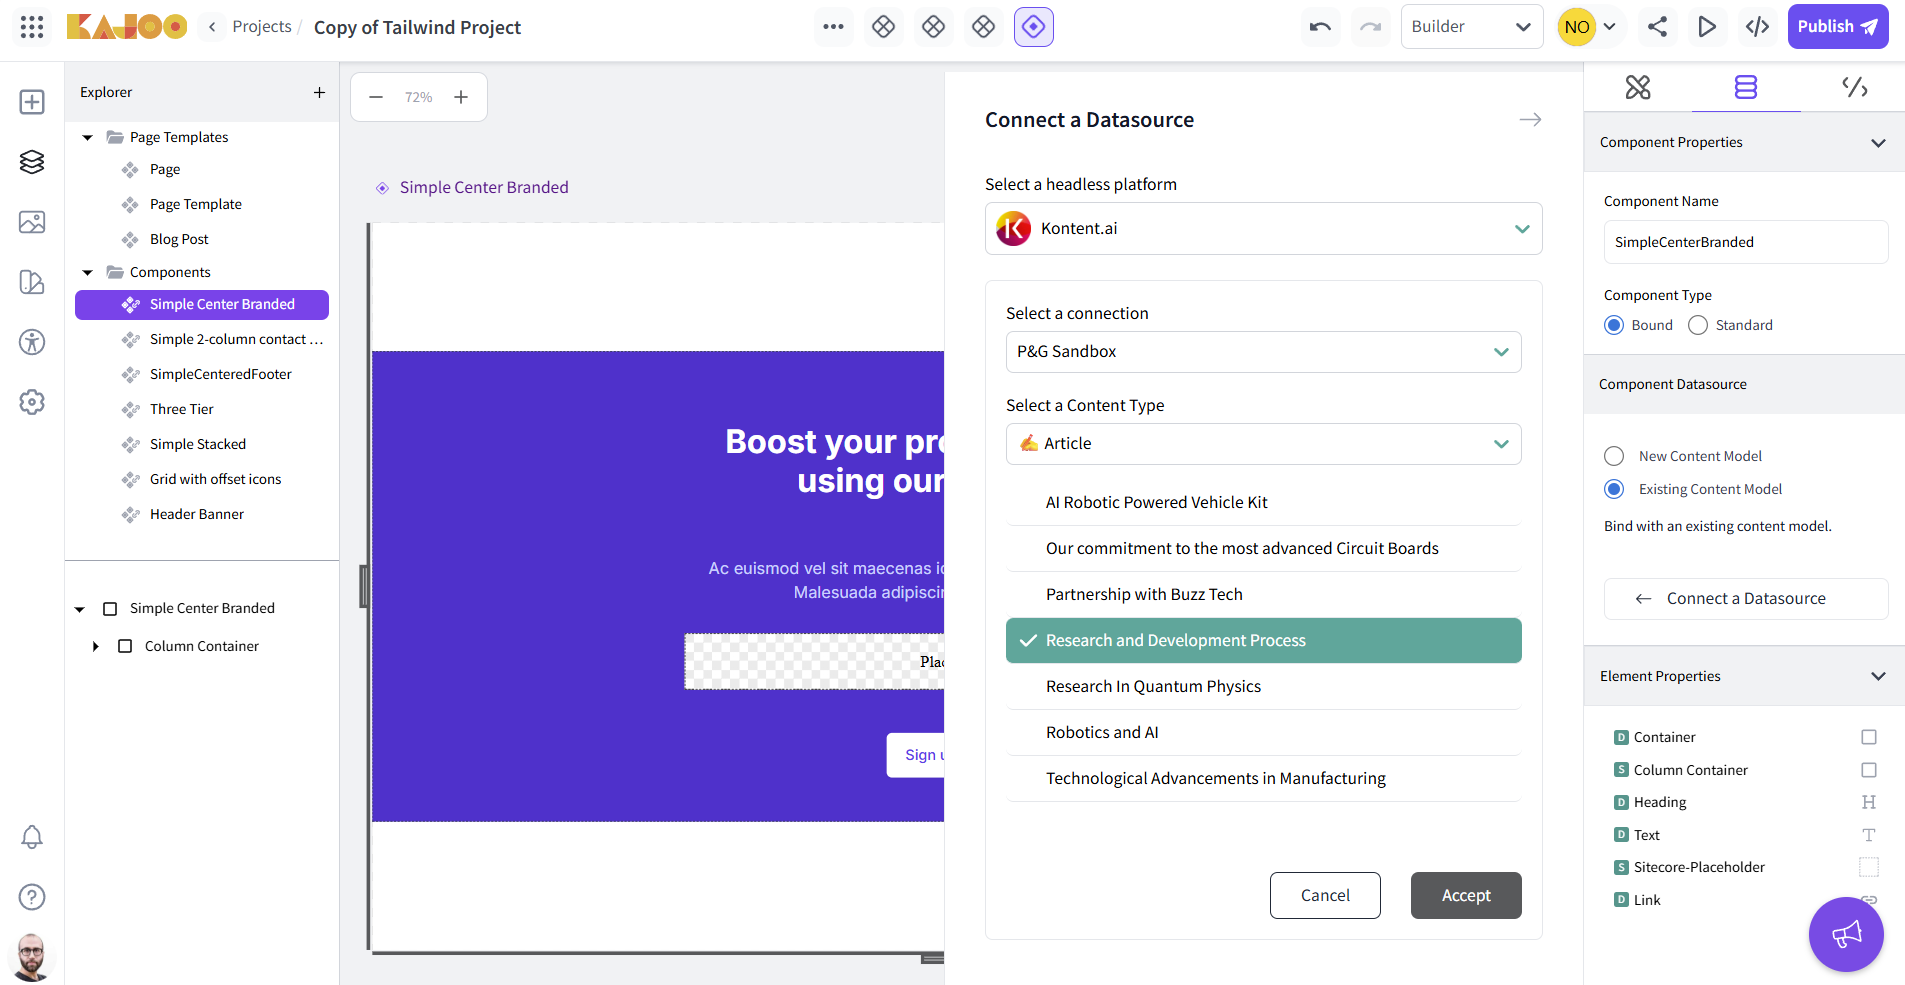
Open your Kajoo Project, and go to Builder.
-
In the Explorer (left), select the component you want to connect (e.g., Simple Center Branded).
-
In the right panel → Component Properties:
- Set Component Type to Bound (so the component can receive data from a datasource).
- Under Component Datasource, select Existing Content Model.
- Click Connect a Datasource.
-
In the Connect a Datasource dialog:
- Select a headless platform: choose Kontent.ai.
- Select a connection: pick one of your Saved Connections (e.g.,
P&G Sandbox). - Select a Content Type: choose the Kontent.ai type that matches your design (e.g.,
Article,Panel,Carousel). - Confirm to bind the type to the component.
-
Map fields to elements:
-
Select each element inside the component (e.g., Heading, Text, Image, Link).
-
In the element’s Properties panel, use the Data Binding (or Content Field) controls to map the UI element to a corresponding field from the chosen Content Type:
- Heading/Text → text or rich_text fields (e.g.,
title,summary). - Image → asset/media fields (e.g.,
hero_image). - Link/Button → url or link fields (e.g.,
cta_link,cta_label). - Repeating blocks → bind a list/array field or modular content to a repeater/list element. Then map the inner children (title, image, link) to each item’s fields.
- Heading/Text → text or rich_text fields (e.g.,
-
-
Save your changes. Use Preview to verify live data rendering. When ready, Publish the project.
Tip: If a field doesn’t appear, confirm you selected the correct content type and that the field exists in Kontent.ai. Refresh the schema in Kajoo if you recently changed the model.
4) Managing & reusing connections
- Return to Integrations → Kontent.ai to edit the Delivery API token or switch the environment ID if needed.
- In the Builder’s Connect a Datasource dialog, you can select a different Saved Connection at any time (helpful for moving a component from Sandbox to Production).
5) Troubleshooting
Test Connection fails
- Double‑check the Delivery API token and Environment ID/codename match the target environment.
- Ensure the token has access to the environment and Delivery API is enabled in Kontent.ai.
- If using Preview token, make sure the connection and environment are intended for preview (unpublished content won’t resolve using the Delivery API token).
Content Types list is empty or outdated
- Confirm the selected Saved Connection points to the right environment.
- Make sure content types exist in Kontent.ai and you have permissions to read them.
- Close and re‑open the Connect a Datasource dialog to refresh the schema after recent model changes.
Fields don’t show in the element mapping
- Verify you bound the component to the Content Type first.
- Check that each element you’re mapping supports the target field type (e.g., image elements need asset fields).
- For repeating content, ensure you’re mapping against a list/array or modular content field, then bind inner children.
Rendering shows empty values
- Make sure content items exist for the selected Content Type and the fields are populated.
- If you rely on Preview content, use the appropriate token/connection.
6) Tips & best practices
- Name connections clearly (e.g.,
P&G Sandbox,P&G Prod) to avoid publishing to the wrong environment. - Model‑component alignment: keep component structures aligned with Kontent.ai content types (fields, repeaters) to minimize mapping friction.
- Separate environments for different stages (Sandbox/UAT/Prod) and switch connections as you promote changes.
7) Glossary
- Delivery API Token: Read‑only token used to fetch published content from Kontent.ai.
- Preview API Token: Token used to fetch unpublished (preview) content.
- Environment ID (codename): The specific environment inside a Kontent.ai project (e.g.,
production,sandbox). - Content Type: The schema/model for a set of content items (e.g.,
Article,Panel). - Bound Component: A Kajoo component configured to receive and display data from an external datasource like Kontent.ai.