

Adding the Kajoo Plugin to your XM Cloud Repository
This guide focuses on integrating the Kajoo plugin with Sitecore XM Cloud. It doesn't cover how to get started with a Sitecore XM Cloud repository-for that, please refer to the Sitecore Documentation - Getting Started with XM Cloud. If you already have an XM Cloud repository and want to add the Kajoo plugin to it, you'll also find this guide helpful.
Kajoo Plugin Integration - Manual Steps
-
To begin installing the Kajoo plugin, download the latest version here: Kajoo Cloud Plugin.zip.
-
After downloading, extract the contents of the zip file to a folder. For this example, I'll extract it to
c:\KajooPlugin. -
Once you've extracted the contents of the zip file, you're ready to move them into your XM Cloud repository. The extracted files should look similar to this:
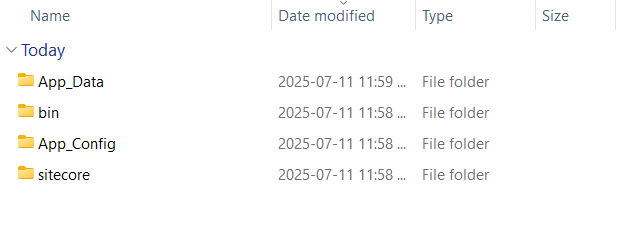
An example of the extracted contents of the Kajoo plugin
-
In your repository's current implementation, navigate from the root to the
authoringfolder (following the typical architecture of the Sitecore XM Cloud Foundation Head repository). You'll find a folder structure similar to the one in the extracted Kajoo plugin files. -
Copy the following folders from the Kajoo extracted package to the
platformfolder in your Sitecore repository:- App_Config
- App_Data
- sitecore
-
Next, let's handle the bin folder. Rename it for
KajooReferencesin the Kajoo plugin folder. Then navigate back to the root folder of your Sitecore repository and move theKajooReferencesfolder there. After this, your folder structure should look something like this: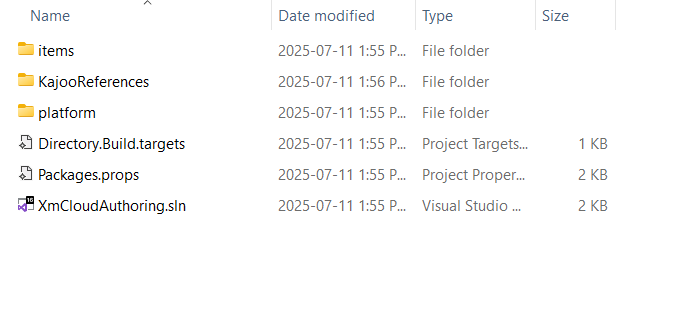
An example of the authoring folder
-
Now that we've finished moving your Kajoo plugin files, let's open the solution to edit the
platformproject. We need to include our plugin assets in the deployment to Sitecore XM Cloud. There are two methods to handle this step, depending on whether you haveVisual Studioor not. Follow the instructions that match your specific scenario, and once completed, return to these steps. -
Important
These steps are crucial. You must follow the instructions below on how to perform them manually or using Visual Studio. If you deploy these changes now without completing these steps, some of the files we've included won't be deployed to XM Cloud. This may result in errors during the deployment.
-
After copying the Kajoo plugin files to your local XM Cloud environment, commit these changes to your source control system. Once committed, deploy the changes to XM Cloud. You can complete this deployment by following the method outlined in the Sitecore documentation: https://doc.sitecore.com/xmc/en/developers/xm-cloud/deploying-xm-cloud.html.
Configure the Project with Visual Studio
These steps assume you have access to Visual Studio and can follow the instructions below.
- First, open
Visual Studioand load the solution file for your XM Cloud repository. This step assumes you've already completed the process of moving the Kajoo plugin into your Sitecore repository. - Once your solution is open and loaded, click the
Show All Filesoption in the Solution Explorer. This will reveal files that are not currently included in your project. - Add the following files to your solution by locating them, right-clicking, and selecting
Include in Project:- App_Config/Include/Kajoo
- App_Data
- sitecore
- After including these files, one final step remains: adding the Kajoo plugin DLL references to this project. This ensures they are also deployed to XM Cloud.
- Within the Platform project, find your
Referencesfolder, right-click and selectAdd Reference. A new window titledReference Manager - Platformwill appear. - Click on the
Browse...option. Then, navigate to the root of your repository and open theKajooReferencesfolder that was created earlier. - Select the following DLLs in this folder (you can multi-select) and click
Add.- Kajoo.Feature.Api.dll
- Kajoo.Feature.Deployment.dll
- Kajoo.Feature.Forms.dll
- Kajoo.Feature.LuanchpadApp.dll
- Kajoo.Feature.Sitemap.dll
- Kajoo.Foundation.Common.dll
- Now Click
Ok. The final step is to ensure you've saved all your changes. You're now ready to proceed with the deployment. Return to the main Kajoo plugin steps to continue.
Configure the Project without Visual Studio
These steps assume you do not currently have Visual Studio installed on your machine, in that case we will make manual changes to your Platform.csproj file.
-
First, navigate to the
Platform.csprojfile. If your Sitecore solution is based on the Sitecore Foundation Head repository, it should be in~/authoring/platform. Once you've found the folder, openPlatform.csprojin your preferred text/code editor. -
Find the following element in your
Platform.csprojfile:<ItemGroup> <None Include="Platform.wpp.targets" /> <None Include="Properties\PublishProfiles\Local.pubxml" /> <None Include="README.md" /> <None Include="web.config" /> </ItemGroup> -
Add the following items to the bottom of this Item Group.
<Content Include="App_Config\Include\Kajoo\Kajoo.Feature.Api.GraphQl.config" /> <Content Include="App_Config\Include\Kajoo\Kajoo.Feature.Deployment.config" /> <Content Include="App_Config\Include\Kajoo\Kajoo.Feature.Forms.config" /> <Content Include="App_Config\Include\Kajoo\Kajoo.Feature.Sitemap.config" /> <Content Include="App_Config\Include\Kajoo\Kajoo.Foundation.Common.config" /> <Content Include="App_Data\kajoo.version.json" /> <Content Include="App_Data\items\master\items.master.kajoo.dat" /> <Content Include="App_Data\items\core\items.core.kajoo.dat" /> <Content Include="sitecore\shell\Themes\Standard\KajooIcons.zip" /> -
Next, locate the following element in your
Platform.csprojfile:<ItemGroup> <Reference Include="Microsoft.CSharp" /> <Reference Include="System" /> <Reference Include="System.Data" /> <Reference Include="System.Data.DataSetExtensions" /> <Reference Include="System.Drawing" /> <Reference Include="System.Web" /> <Reference Include="System.Web.ApplicationServices" /> <Reference Include="System.Web.DynamicData" /> <Reference Include="System.Web.Entity" /> <Reference Include="System.Web.Extensions" /> <Reference Include="System.Xml" /> <Reference Include="System.Xml.Linq" /> </ItemGroup> -
Next, add the following items to the top of the
ItemGroupmentioned above.<Reference Include="Kajoo.Feature.Api"> <HintPath>..\KajooReferences\Kajoo.Feature.Api.dll</HintPath> </Reference> <Reference Include="Kajoo.Feature.Deployment"> <HintPath>..\KajooReferences\Kajoo.Feature.Deployment.dll</HintPath> </Reference> <Reference Include="Kajoo.Feature.Forms"> <HintPath>..\KajooReferences\Kajoo.Feature.Forms.dll</HintPath> </Reference> <Reference Include="Kajoo.Feature.LuanchpadApp"> <HintPath>..\KajooReferences\Kajoo.Feature.LuanchpadApp.dll</HintPath> </Reference> <Reference Include="Kajoo.Feature.Sitemap"> <HintPath>..\KajooReferences\Kajoo.Feature.Sitemap.dll</HintPath> </Reference> <Reference Include="Kajoo.Foundation.Common"> <HintPath>..\KajooReferences\Kajoo.Foundation.Common.dll</HintPath> </Reference> -
That's it! Now save the changes to your
Platform.csprojfile and continue with the remaining steps in the original guide..
Updated 2 months ago