Installing the Plugins
Developers
This guide will walk you through the Docker and manual steps for installing the Kajoo plugin with your Sitecore platform DXP environment. Once you've completed these steps, you'll be ready to register your Sitecore environment. You can learn more about registration here: How to Register a Sitecore Instance.
Download the Kajoo Plugin
- From the Dashboard page, navigate to the
Configurationspage using the left-hand navigation menu. On this page, you can configure a Sitecore Instance by clicking theInstancestab in the navigation bar. - Next, click
Register Instance. This will open a popup with the option to download the Plugin for installation in your Sitecore environment. If you're unsure which version of Sitecore you're using, learn more here: https://sitecore.stackexchange.com/questions/338/what-are-the-ways-to-find-the-sitecore-version-on-sitecore-installations about determining your Sitecore version. - Kajoo currently supports the following Sitecore versions:
- 10.3
- 10.2
- 10.1
- 9.3
- To download the update package, click the download icon to save it to your local machine. For Sitecore XM Cloud users, find more information on the XM Cloud page here: XM Cloud.
Manual Install (Non Docker)
For Docker/Kubernetes-based Sitecore environments, skip the following steps and proceed to Steps for Working with Docker Images. If you're performing a manual install, ensure your environment has Headless Services installed before proceeding with the Kajoo plugin installation.
-
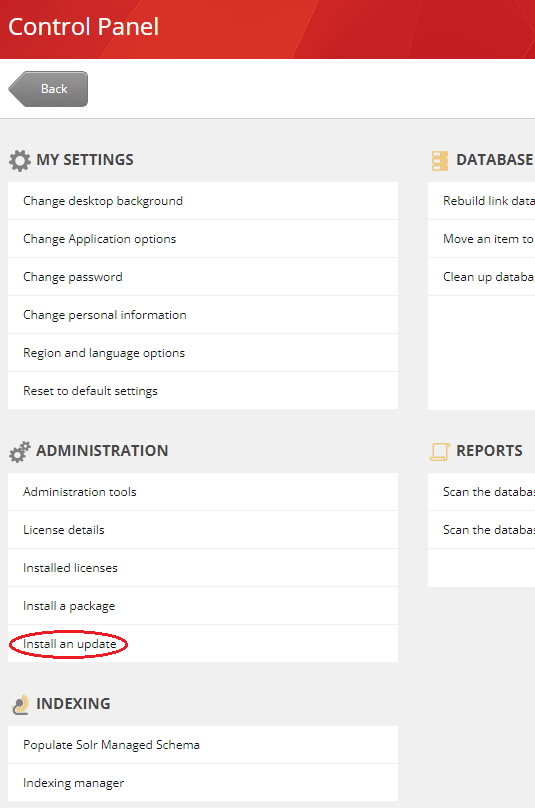
After downloading the update package, let's proceed to your Sitecore Content Management environment to install it. First, log in. Once on the Launch page, navigate to the
Control Panel. Then, look underAdministration > Install an Update.
-
Alternatively, you can directly access the
Install an updatepage by navigating to:/sitecore/admin/UpdateInstallationWizard.aspxin your browser navigation. -
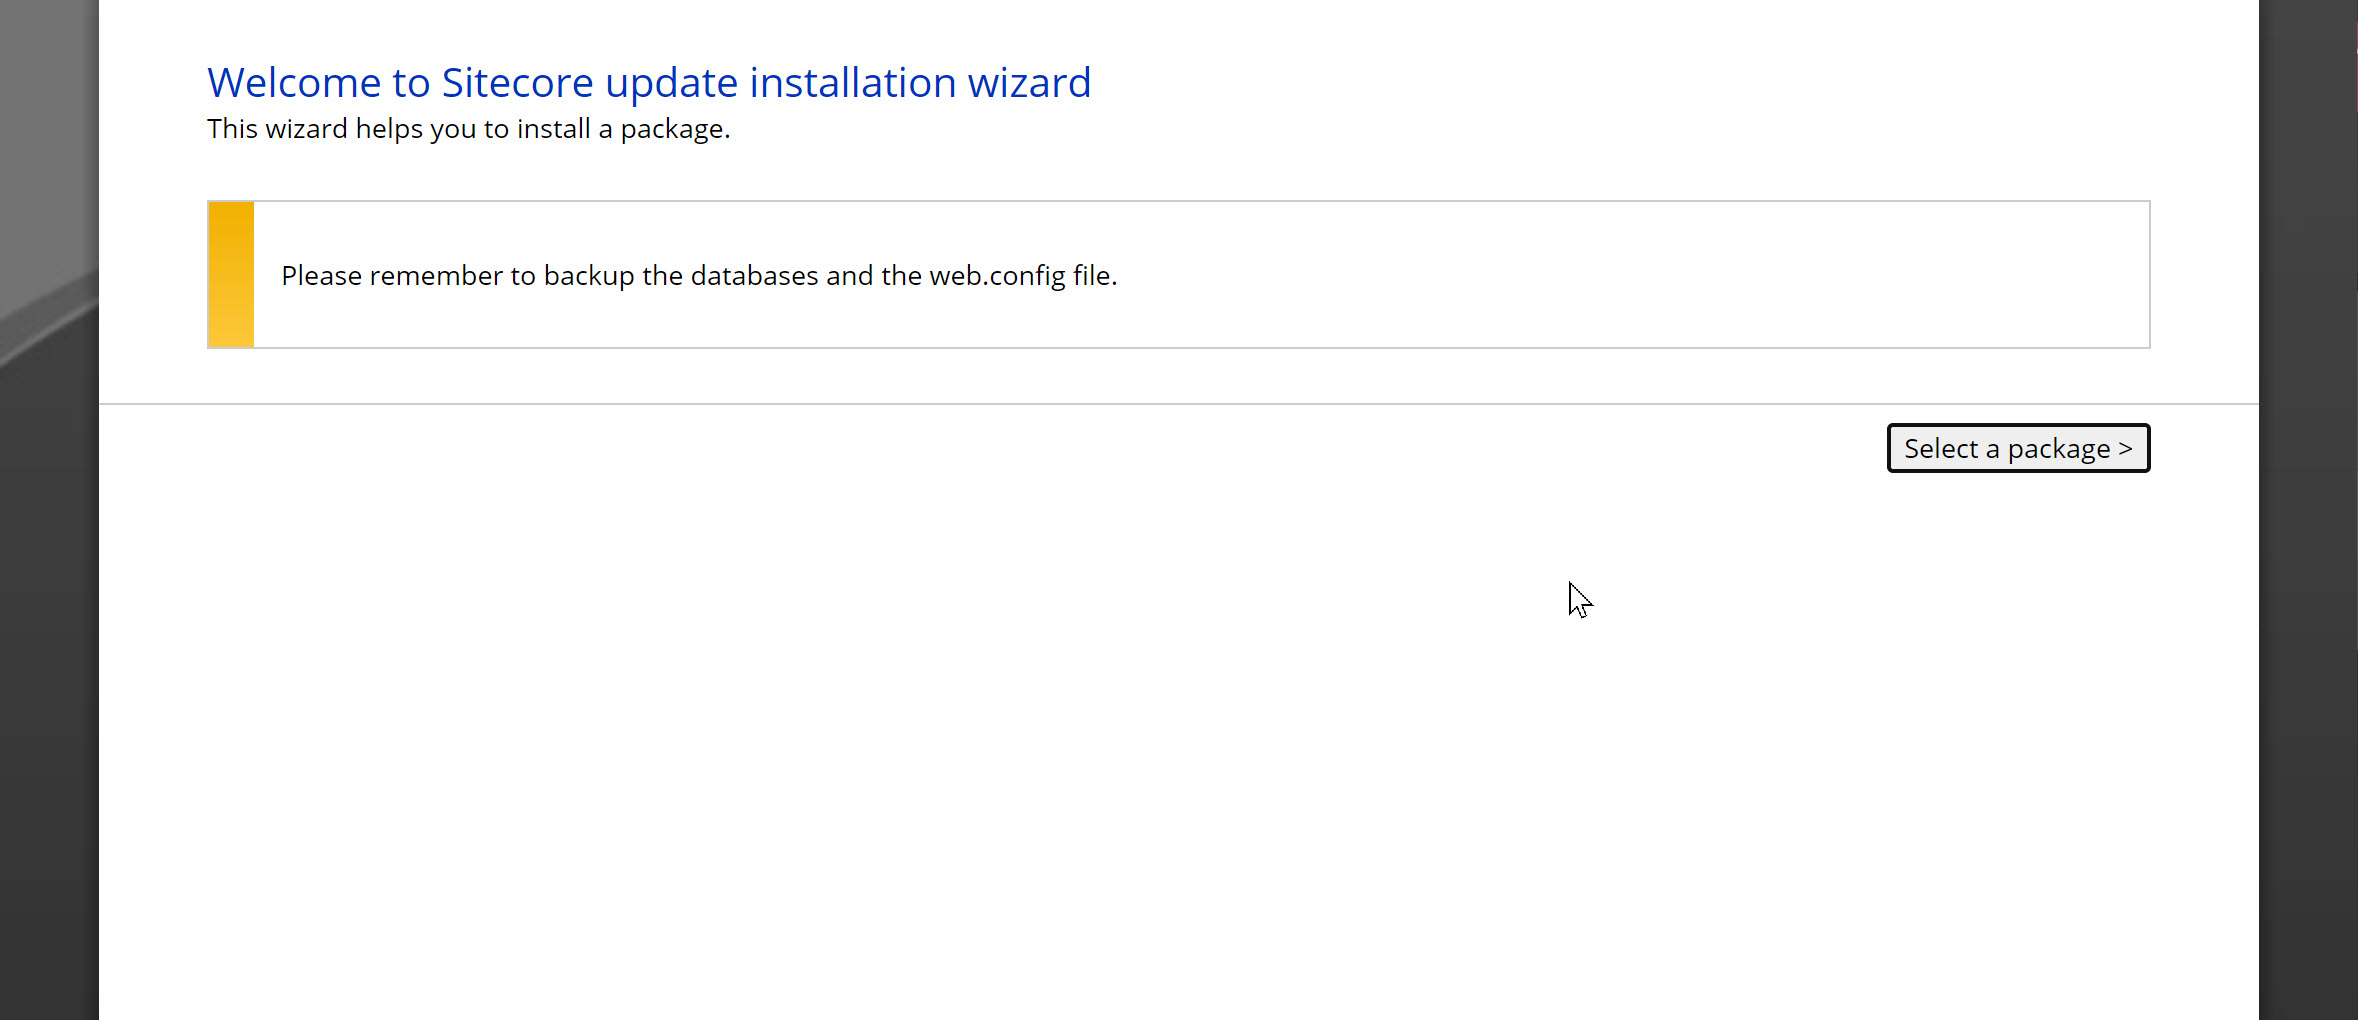
If you've followed these steps correctly, you should now see the following:

-
-
At the Update Installation Wizard, click
Select a package >and choose the update package you downloaded earlier. If you've previously installed the package, it will appear in the list of existing packages. Remember, you only need to install the update package once. -
Now click on
Package information >button. -
The system will now display additional information about the package, including its version and author. To proceed, click the
Analyze the package >button, which will take you to the next page. -
On this page, we'll initiate the analysis of the package to check for conflicts. Leave all the advanced options checked by default, then click
Analyze. This step will take several minutes, as it determines the changes and conflicts involved in installing this update package. -
Once the analysis is complete, click the
Analyze results >button to continue installing Kajoo plugin. -
After viewing the analysis result, proceed with the installation by clicking
Install the package >. Don't worry about any existing items shown. -
During the installation, if you encounter errors, report them to [email protected]. Otherwise, upon completion of the installation click on the
Installation result >button. -
Upon successful installation, return to the
Launchpad. You should now see the Kajoo application. A few final steps remain to complete and verify the installation before you can start the Register the Instance step. -
Add the required origins to the
Content Security Policyheader by modifying yourContent Managementenvironment's rootweb.config. It's best to apply an XDT transformation to this file, rather than making direct customizations locally or in a production environment.- default-src add "cdnjs.cloudflare.com .kajoo.ca/ .auth0.com *.kajoo.ai"
- style-src add "cdnjs.cloudflare.com"
-
After completing the XDT transformation, your file should have a configuration similar to this:
<add name="Content-Security-Policy" value="default-src 'self' 'unsafe-inline' 'unsafe-eval' cdnjs.cloudflare.com *.kajoo.ca/ *.auth0.com *.kajoo.ai; img-src 'self' data:; style-src 'self' 'unsafe-inline' https://fonts.googleapis.com cdnjs.cloudflare.com; font-src 'self' 'unsafe-inline' https://fonts.gstatic.com; upgrade-insecure-requests; block-all-mixed-content;" />- If you are uncertain about the structure of the XDT transform, here's an example to guide you:
<?xml version="1.0"?>
<configuration xmlns:xdt="http://schemas.microsoft.com/XML-Document-Transform">
    <location path="sitecore">
        <system.webServer>
            <httpProtocol>
                <customHeaders>
                <remove name="Content-Security-Policy" xdt:Transform="Remove" xdt:Locator="Match(name)" />
                    <!-- Insert if missing -->
                    <add name="Content-Security-Policy"
                        value="default-src 'self' 'unsafe-inline' 'unsafe-eval' cdnjs.cloudflare.com *.kajoo.ca *.auth0.com *.kajoo.ai; img-src 'self' data: https://s.gravatar.com https://*.wp.com/cdn.auth0.com/avatars; style-src 'self' 'unsafe-inline' https://fonts.googleapis.com cdnjs.cloudflare.com; font-src 'self' 'unsafe-inline' https://fonts.gstatic.com; connect-src 'self' https://api.kajoo.ai https://auth.kajoo.ai; upgrade-insecure-requests;"
                        xdt:Transform="InsertIfMissing"
                        xdt:Locator="Match(name)" />
                    <add name="Content-Security-Policy"
                         value="default-src 'self' 'unsafe-inline' 'unsafe-eval' cdnjs.cloudflare.com *.kajoo.ca *.auth0.com *.kajoo.ai; img-src 'self' data: https://s.gravatar.com https://*.wp.com/cdn.auth0.com/avatars; style-src 'self' 'unsafe-inline' https://fonts.googleapis.com cdnjs.cloudflare.com; font-src 'self' 'unsafe-inline' https://fonts.gstatic.com; connect-src 'self' https://api.kajoo.ai https://auth.kajoo.ai; upgrade-insecure-requests;"
                         xdt:Transform="SetAttributes"
                         xdt:Locator="Match(name)" />
                </customHeaders>
            </httpProtocol>
        </system.webServer>
    </location>
</configuration>- You should have successfully installed the Kajoo plugin and configured the
Content Security Policy. Let's now proceed to the section to Confirm the Kajoo Plugin Installation.
Steps For Working with Docker Images
Due to Docker's architecture, you shouldn't install the .update package directly. Instead, create a Kajoo init image and incorporate it into your Content Management Docker image.
Building The Kajoo Init Asset Image
-
Create a folder to store the files needed for image creation. This guide uses
c:\SitecoreDocker\KajooImage\as an example. Replace this path with your chosen directory throughout the instructions. -
Create a file named
convert-update-to-image.ps1and insert the following code:
# Get the directory of the current script
$scriptDir = Split-Path -Parent $MyInvocation.MyCommand.Path

# Define the config
$updateFilePath = Join-Path $scriptDir "Kajoo.Sitecore.Package.1.4-sc10.3.update"
$toolkitPath = Join-Path $scriptDir "SitecoreAzureToolkit\tools"
$dockerInitImage = "kajoo-init"
$dockerInitImageTag = "1.4-sc10.3"
$outDir = $scriptDir
$scwdpFile = Join-Path $outDir "Kajoo.Sitecore.Package.1.4-sc10.3.scwdp.zip"
$scwdpExtractDir = Join-Path $outDir "scwdp-extract"
$imagePrepDir = Join-Path $outDir "assets"

# Step 1: Import the Sitecore Azure Toolkit modules
try {
	Import-Module (Join-Path $toolkitPath "Sitecore.Cloud.Cmdlets.dll")
    Import-Module (Join-Path $toolkitPath "Sitecore.Cloud.Cmdlets.psm1")
} catch {
	Write-Error "Failed to import Sitecore Azure Toolkit modules. $_"
    exit 1
}

# Step 2: Run ConvertTo-SCModuleWebDeployPackage
try {
    ConvertTo-SCModuleWebDeployPackage -Path $updateFilePath -Destination $outDir -ErrorAction Stop
    Write-Output "Conversion to scwdp completed successfully."
} catch {
    Write-Error "Failed to convert update package to scwdp. $_"
    exit 1
}

# Step 3: Extract SCWDP and Prep Docker Structure
try {
    # Create directories if they don't exist
    New-Item -ItemType Directory -Path $scwdpExtractDir -Force | Out-Null
    New-Item -ItemType Directory -Path $imagePrepDir -Force | Out-Null
    New-Item -ItemType Directory -Path (Join-Path $imagePrepDir "module/db") -Force | Out-Null
    New-Item -ItemType Directory -Path (Join-Path $imagePrepDir "module/cm/content") -Force | Out-Null

    # Extract the SCWDP file
    Expand-Archive -Path $scwdpFile -DestinationPath $scwdpExtractDir -Force

    # Move DACPAC files to the destination directory
    Get-ChildItem -Path $scwdpExtractDir -Recurse -Filter *.dacpac | ForEach-Object {
        $newFileName = "Sitecore." + $_.Name
        $destinationPath = Join-Path -Path (Join-Path $imagePrepDir "module/db") -ChildPath $newFileName
        Move-Item -Path $_.FullName -Destination $destinationPath -Force
    }

    # Move everything in Content to module/cm/content
    Get-ChildItem -Path (Join-Path $scwdpExtractDir "Content") | ForEach-Object {
        Move-Item -Path $_.FullName -Destination (Join-Path $imagePrepDir "module/cm/content") -Force
    }

    # Move everything from module/cm/content/website to module/cm/content
    Get-ChildItem -Path (Join-Path $imagePrepDir "module/cm/content/Website") | ForEach-Object {
        Move-Item -Path $_.FullName -Destination (Join-Path $imagePrepDir "module/cm/content") -Force
    }

    # Remove the now-empty Website directory
    Remove-Item -Path (Join-Path $imagePrepDir "module/cm/content/Website") -Recurse -Force


    # Copy the web.config.xdt to the module/cm/content/Website folder
    Copy-Item -Path (Join-Path $scriptDir "web.config.xdt") -Destination (Join-Path $imagePrepDir "module/cm/content") -Force

    Write-Output "SCWDP extracted and Docker structure prepared successfully."

} catch {
    Write-Error "Failed to prep docker image folders. $_"
    exit 1
}

# Step 4: Create the Docker Image
try {
    $dockerInitImageFullName = "${dockerInitImage}:${dockerInitImageTag}"

    docker build --tag $dockerInitImageFullName . --no-cache

    Write-Output "Docker Init Image created successfully."
} catch {
    Write-Error "Failed to create Docker Asset Image. $_"
    exit 1
}
-
Before proceeding to the next steps, note that the
convert-update-to-image.ps1file contains a configuration section. This section varies depending on your Sitecore DXP platform version. Be sure to update the configuration starting from line 4. -
Place the Kajoo update file obtained from the previous steps into the
c:\SitecoreDocker\KajooImage\directory. -
Add a
Dockerfiletoc:\SitecoreDocker\KajooImagewith the following content:FROM mcr.microsoft.com/windows/nanoserver:ltsc2022 AS build COPY assets/ .
- Don't worry about creating an
assetsfolder; it's automatically generated when you run the PowerShell script mentioned above. Next, download the latest Sitecore Azure Toolkit from https://developers.sitecore.com/downloads/Sitecore_Azure_Toolkit. Extract the contents and place them in a folder namedSitecoreAzureToolkit. If done correctly, this folder should contain subdirectories such astoolsandCopyrights. - Finally, we need to add a
Web.configtransform. Alternatively, you could add this directly when modifying your Content Management build configuration--the choice is yours. This is the most ideal approach.<?xml version="1.0"?> <configuration xmlns:xdt="http://schemas.microsoft.com/XML-Document-Transform"> <location path="sitecore"> <system.webServer> <httpProtocol> <customHeaders> <remove name="Content-Security-Policy" xdt:Transform="Remove" xdt:Locator="Match(name)" /> <!-- Insert if missing --> <add name="Content-Security-Policy" value="default-src 'self' 'unsafe-inline' 'unsafe-eval' cdnjs.cloudflare.com *.kajoo.ca *.auth0.com *.kajoo.ai; img-src 'self' data: https://s.gravatar.com https://*.wp.com/cdn.auth0.com/avatars; style-src 'self' 'unsafe-inline' https://fonts.googleapis.com cdnjs.cloudflare.com; font-src 'self' 'unsafe-inline' https://fonts.gstatic.com; connect-src 'self' https://api.kajoo.ai https://auth.kajoo.ai; upgrade-insecure-requests;" xdt:Transform="InsertIfMissing" xdt:Locator="Match(name)" /> <add name="Content-Security-Policy" value="default-src 'self' 'unsafe-inline' 'unsafe-eval' cdnjs.cloudflare.com *.kajoo.ca *.auth0.com *.kajoo.ai; img-src 'self' data: https://s.gravatar.com https://*.wp.com/cdn.auth0.com/avatars; style-src 'self' 'unsafe-inline' https://fonts.googleapis.com cdnjs.cloudflare.com; font-src 'self' 'unsafe-inline' https://fonts.gstatic.com; connect-src 'self' https://api.kajoo.ai https://auth.kajoo.ai; upgrade-insecure-requests;" xdt:Transform="SetAttributes" xdt:Locator="Match(name)" /> </customHeaders> </httpProtocol> </system.webServer> </location> </configuration>
- Run the PowerShell script by executing
$ .\convert-update-to-image. This script will automatically build your image. In our example, we were building a 10.3 image, so our new Docker asset image is calledkajoo-init:1.4-sc10.3. This may vary depending on the configuration of your PowerShell script.NoteEnsure you run the script in PowerShell 5.1. The Sitecore Azure Toolkit requires this specific version, and newer PowerShell versions will fail.
Adding the Kajoo Init Asset Image to Your Docker Environment
Before following these steps, ensure you're familiar with Docker customizations and have applied Headless Services to your Sitecore environment. For guidance on creating custom images, refer to the latest Sitecore documentation: https://doc.sitecore.com/xp/en/developers/103/developer-tools/create-custom-sitecore-images.html.
- Assuming you have already created custom images for CD, CM, and mssql-init for Headless Services, we'll need to make additional changes to CM and mssql-init to apply Kajoo. We'll assume your Docker build
Dockerfileis located in.\docker\build\[role]. For example, the Docker file for the CM customizations would be located at.\docker\build\cm. - Let's begin by making the necessary changes to the
docker-compose.override.ymlfile.Note a few key points about this file that may differ for your specific setup:services: mssql-init: image: xm1-mssql-init:${SITECORE_VERSION} build: context: ./docker/build/mssql-init args: BASE_IMAGE: ${SITECORE_DOCKER_REGISTRY}sitecore-xm1-mssql-init:${SITECORE_VERSION} HEADLESS_IMAGE: ${SITECORE_MODULE_REGISTRY}sitecore-headless-services-xm1-assets:22.0-ltsc2022 KAJOO_IMAGE: kajoo-init:1.4-sc10.3 cm: image: xm1-cm:${SITECORE_VERSION} build: context: ./docker/build/cm args: BASE_IMAGE: ${SITECORE_DOCKER_REGISTRY}sitecore-xm1-cm:${SITECORE_VERSION} HEADLESS_IMAGE: ${SITECORE_MODULE_REGISTRY}sitecore-headless-services-xm1-assets:22.0-ltsc2022 TOOLING_IMAGE: ${SITECORE_TOOLS_REGISTRY}sitecore-docker-tools-assets:10.3.0-1809 KAJOO_IMAGE: kajoo-init:1.4-sc10.3 cd: image: xm1-cd:${SITECORE_VERSION} build: context: ./docker/build/cd args: BASE_IMAGE: ${SITECORE_DOCKER_REGISTRY}sitecore-xm1-cd:${SITECORE_VERSION} HEADLESS_IMAGE: ${SITECORE_MODULE_REGISTRY}sitecore-headless-services-xm1-assets:22.0-ltsc2022- I'm using an XM1 instance, but your scenario might be different.
- The crucial additions are
KAJOO_IMAGEandTOOLING_IMAGE, which are needed to run XDT Transforms for theweb.config.
I've used a Kajoo Plugin package specifically for Sitecore 10.3, but this may vary based on your situation.
This override uses multiple environment variables. While most are common in existing Docker environment configurations, there are specific registries used here. Be sure to update your environment variables with these new values, which are listed below. - SITECORE_DOCKER_REGISTRY = scr.sitecore.com/sxp/
- SITECORE_MODULE_REGISTRY = scr.sitecore.com/sxp/modules/
- SITECORE_TOOLS_REGISTRY = scr.sitecore.com/tools/
- Now that you've configured the override docker-compose file, let's go through the steps needed for each
Dockerfile. We'll start with the CM:
# escape=`

ARG BASE_IMAGE
ARG HEADLESS_IMAGE
ARG KAJOO_IMAGE
ARG TOOLING_IMAGE

FROM ${HEADLESS_IMAGE} as headless
FROM ${KAJOO_IMAGE} as kajoo
FROM ${TOOLING_IMAGE} as tooling
FROM ${BASE_IMAGE}

SHELL ["powershell", "-Command", "$ErrorActionPreference = 'Stop'; $ProgressPreference = 'SilentlyContinue';"]

COPY --from=tooling \tools\ \tools\
COPY --from=headless C:\module\cm\content C:\inetpub\wwwroot
COPY --from=headless C:\module\tools C:\module\tools
COPY --from=kajoo C:\module\cm\content C:\inetpub\wwwroot

RUN C:\module\tools\Initialize-Content.ps1 -TargetPath C:\inetpub\wwwroot; `
  Remove-Item -Path C:\module -Recurse -Force;

RUN C:\tools\scripts\Invoke-XdtTransform.ps1 -Path c:\inetpub\wwwroot\Web.config -XdtPath C:\inetpub\wwwroot\Web.config.xdt; `
  Remove-Item -Path C:\inetpub\wwwroot\Web.config.xdt
There are important aspects to note in this file. On line 15, we set up the tools, which we then use to perform an XDT Transform for our web.config.xdt. This transform configures some Content Security Policy definitions in our web.config. Additionally, on line 18, we take the multi-stage build of Kajoo and move it's contents into the Sitecore website.
- Next, let's look at the necessary changes for the
mssql-initDockerfile:
# escape=`

ARG BASE_IMAGE
ARG HEADLESS_IMAGE
ARG KAJOO_IMAGE

FROM ${HEADLESS_IMAGE} as headless
FROM ${KAJOO_IMAGE} as kajoo
FROM ${BASE_IMAGE}

SHELL ["powershell", "-Command", "$ErrorActionPreference = 'Stop'; $ProgressPreference = 'SilentlyContinue';"]

COPY --from=headless C:\module\db C:\resources\jss

COPY --from=kajoo c:\module\db C:\resources\kajoo
When modifying the mssql-init role, it's crucial to delete the databases in your data folder and rerun the initialization process. Failing to do so will prevent the transfer of required Kajoo Sitecore items.
Updated 1 day ago